The Color Wheel Method: How to Add Emotional Depth to Voice Acting Performances
Most voice acting performances by developing actors share a common weakness: they hit one emotional note and stay there. The villain monologue is just angry. The vulnerable scene is just sad. The triumphant moment is just happy. Whatever the dominant emotion of the scene, the performer locks onto it and delivers a single-color version of the entire piece.
Casting directors recognize this pattern instantly. They've heard a thousand auditions where the actor identified the obvious emotion and committed to it without nuance. These performances aren't bad exactly. They're just flat. They lack the layered complexity that distinguishes memorable voice work from forgettable.
Today I want to walk through a specific framework that fixes this problem: using a color wheel approach to emotional analysis. I'll cover how to apply this to scene preparation, why diction often makes or breaks otherwise strong voice acting, and the practical workflow for getting started in voice acting from scratch including the gear, software, and platforms that actually matter at the entry level.
Want to work with me one-on-one?
The Plutchik Color Wheel for Acting
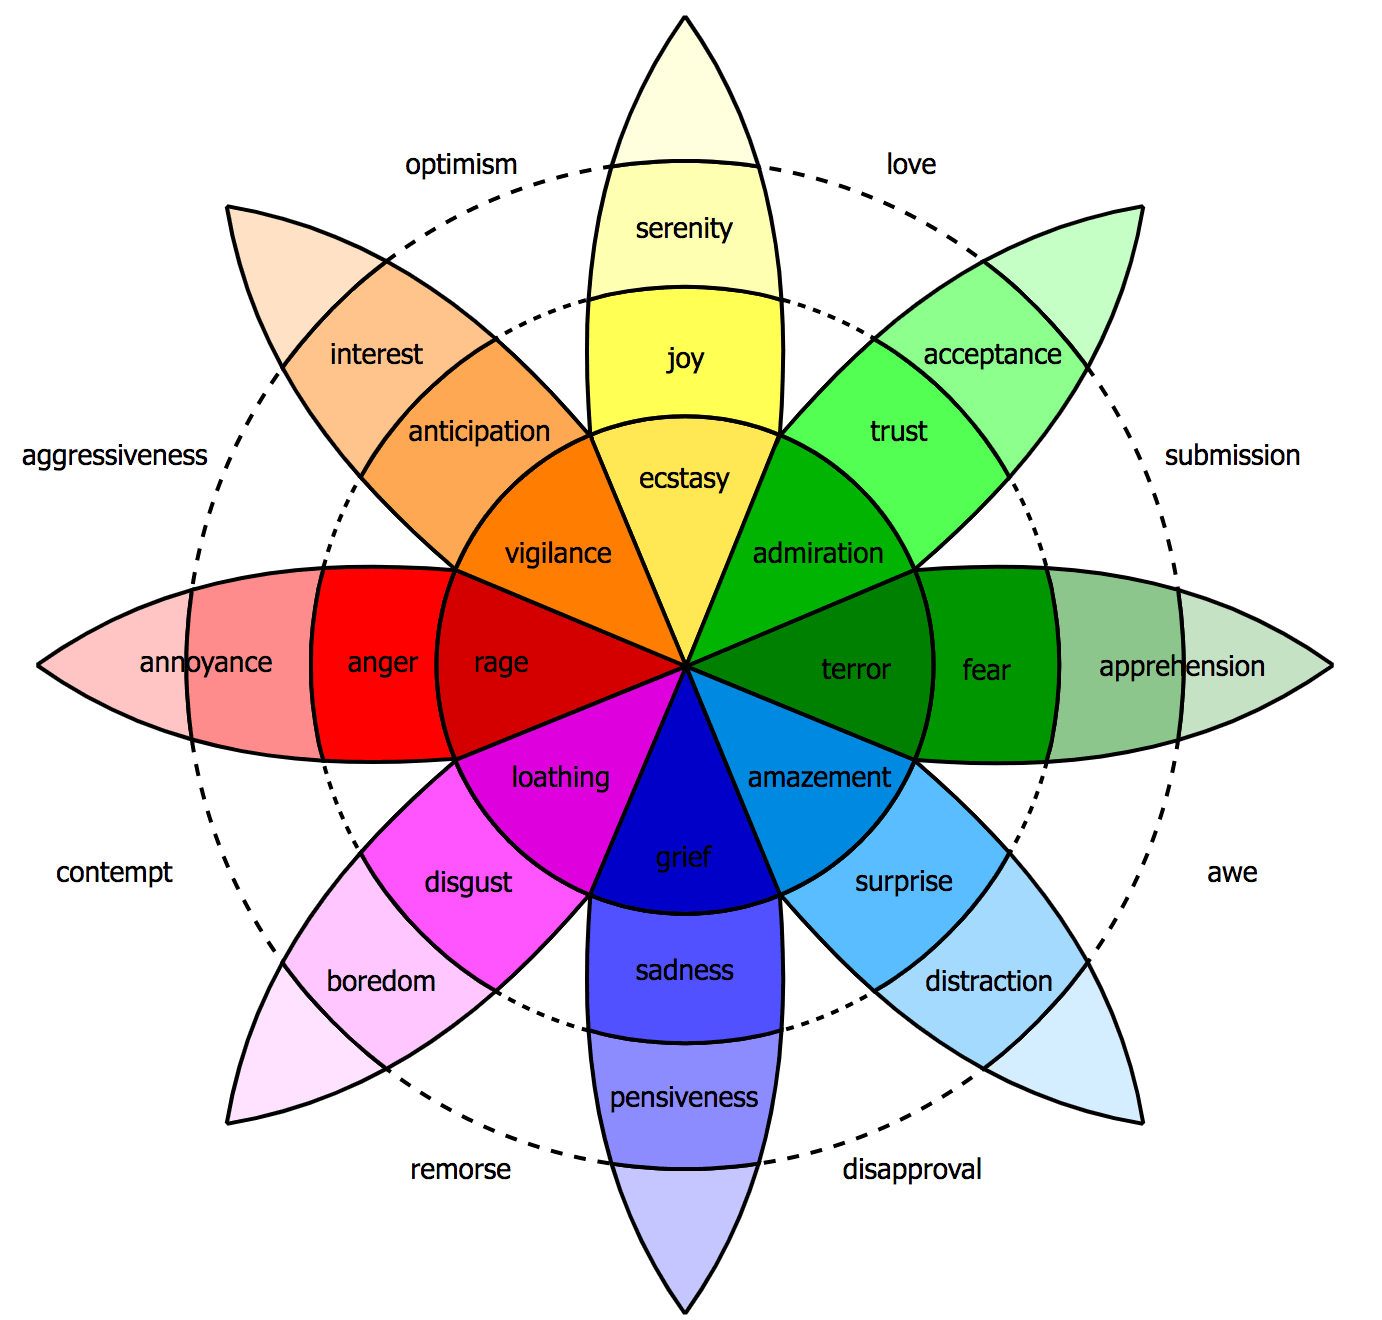
Psychologist Robert Plutchik developed a model that organizes human emotions into a color wheel, with primary emotions and their relationships mapped visually. While the original model was created for psychology research, it's become a useful tool for actors and voice actors because it gives you a vocabulary for thinking about emotional complexity.
The basics of the wheel:
Red: Anger
Blue: Sadness
Yellow: Joy or happiness
Green: Trust
Purple: Disgust
Orange: Anticipation or excitement
Dark Green: Fear
Light Blue: Surprise
And various other emotions positioned around the wheel
The key insight isn't memorizing every emotion's color. It's the principle that emotions exist in combinations and relationships, not isolation. A performance that includes only one color is missing the depth that real emotional experience involves.
Identifying the Primary Color of a Scene
For any scene you're preparing, the first analytical question is: what's the dominant emotional color?
This is usually obvious. A villain delivering threats: red (anger). A character mourning a loss: blue (sadness). A character celebrating victory: yellow (joy). A character reacting to something repulsive: purple (disgust).
Most actors get this far. The dominant emotion is identifiable. They commit to it. And they stop.
Adding Secondary Colors
The next analytical step is where most developing actors don't go: what other colors are present in this scene that aren't the dominant emotion?
Take a villain monologue. The dominant color is red (anger). But what else might be there?
Purple (disgust): the villain isn't just angry, they're contemptuous of their target
Yellow (twisted joy): the villain might be enjoying their own performance, savoring their power
Blue (underlying sadness): in a sympathetic villain, there's often grief or loss underneath the rage
Green (perverted trust): a villain might believe deeply in their own cause, even loyalty to a corrupted ideal
A performance that includes red plus one or two of these secondary colors becomes dramatically more interesting than red alone. The audience picks up on the layers, even if they couldn't articulate what they're picking up on.
Applying the Wheel to Specific Lines
Beyond identifying overall scene colors, you can apply the wheel to specific lines or moments within a scene.
A villain delivering a long speech might:
Open with red (raw anger)
Shift to purple on a particular line (disgust at the target's weakness)
Drop briefly into blue on a memory (loss that fueled the anger)
Rise back through orange (anticipation of vengeance)
Land on a final beat that combines red and yellow (rage mixed with twisted satisfaction)
Mapping out a piece this way before performing it transforms what could have been a one-color delivery into a complex emotional journey. The audience experiences the character as a real person with internal complexity, not as a single-emotion delivery system.
Receiving Color Notes During Performance
A specific coaching technique that works well with the color wheel framework: receiving brief directional notes during a performance.
Working with a coach who can call out colors during a scene gives you real-time emotional direction without requiring lengthy intellectual breakdown. "More red here." "Find the purple." "Add some blue underneath." These quick prompts let the technical work happen in your subconscious while your conscious attention stays on the scene.
This is similar to how personal trainers work. They don't lecture you about exercise physiology mid-set. They say "engage your core" or "drive through your heels" or "exhale on the push." Brief, focused, immediately applicable. Same principle for emotional direction in performance.
If you're working alone, you can do a version of this for yourself by marking your script with color notes and using them as reminders during your takes. The notes shouldn't be prescriptive ("feel angry here"). They should be directional cues ("red shifting to purple here") that prompt your instincts without requiring conscious analysis.
Diction: The Often-Ignored Foundation
A separate but critical issue for voice actors: diction matters enormously, and many otherwise capable performers don't realize how much theirs is limiting them.
Diction is the clarity of your speech. How clearly each word and consonant comes through. How distinct each syllable is. How well a listener can understand what you're saying without strain.
Stage actors often have well-developed diction because theatrical training emphasizes it explicitly. Many voice actors, especially self-taught ones, have weaker diction than they realize. Their natural conversational speech might mush certain consonants, blur word boundaries, or drop syllable endings. These habits don't matter much in casual conversation. They matter enormously in voice work, where every consonant gets recorded and every unclear moment frustrates listeners.
Signs Your Diction Needs Work
A few diagnostic questions:
When you record yourself, can a listener understand every word on first listen?
Are you ever asked to repeat yourself in conversation?
Do consonants like T, D, K, and G come through crisply or do they get swallowed?
Do you finish words, or do the endings trail off?
Do listeners ever say your voice sounds "muddy" or "soft"?
If any of these point to diction issues, the fix is dedicated practice with diction exercises.
Tongue Twister Practice
The classic tool for diction development is tongue twister practice. These deliberately challenging phrases force your articulation muscles (lips, tongue, soft palate, jaw) to engage more fully and precisely than casual speech requires.
Practice 5-10 minutes per week with tongue twisters that target different consonant patterns:
Bilabial sounds (P, B): "Peter Piper picked a peck of pickled peppers"
Alveolar sounds (T, D, S, Z): "Sally sells seashells by the seashore"
Velar sounds (K, G): "How can a clam cram in a clean cream can"
Mixed consonant clusters: "Red leather, yellow leather"
Tongue twisters specifically focused on word boundaries: "Unique New York, unique New York"
Start slow and clear. Speed matters less than precision. Once you can deliver each twister cleanly at conversational pace, gradually push the tempo. The goal is muscle development, not just immediate performance.
This work pays dividends across everything you do as a voice actor. Your scripted reads become clearer. Your character work has more crispness. Your auditions feel more polished without sounding labored.
Slowing Down for Clarity
Beyond exercise work, an immediate fix for diction issues during recording: slow down.
Most voice actors, especially when nervous or excited, deliver lines faster than their articulation can keep up with. The result is mushy, rushed, hard-to-understand audio. The fix isn't always more practice; sometimes it's just deliberately reducing your tempo.
Try this in your next recording session: take a script and deliver it 20% slower than your natural pace. Notice how much clearer your consonants become. Notice how much more distinct each word feels. The slower pace lets your articulation muscles fully engage with each sound.
You can adjust the tempo back up once your diction is reliable, but starting slow builds the habit of clarity. Many professional voice actors deliver at a slightly slower pace than ordinary conversation, and the result reads as polished rather than slow.
Move Your Mouth More
Related to diction: many voice actors don't physically engage their mouths enough during recording. They speak with minimal lip movement, minimal jaw movement, minimal tongue movement. The muscles are doing the bare minimum.
Conscious physical engagement with each word produces much clearer audio. Move your lips deliberately. Open your jaw slightly more than feels necessary. Let your tongue do its full range of motion. The deliberate physical work translates to crisp, clear sound.
This feels exaggerated at first. Recordings reveal that what feels exaggerated to you usually sounds natural and clear in playback. Trust the discipline.
Given Circumstances
A useful acting framework that comes up constantly in coaching: given circumstances.
Given circumstances are the established facts of a scene that the script provides or implies. The character's identity, their relationships, the location, the time period, what just happened, what's about to happen, the stakes involved. These facts aren't optional or interpretive. They're given.
Before performing any scene, identify the given circumstances:
Who is this character?
What's their history and background?
Who are they speaking to and what's their relationship?
Where are they? What's the physical environment?
When is this happening? What's the broader context?
What just happened that led to this moment?
What do they want from this interaction?
What's at stake if they don't get it?
These questions ground your performance in specific reality rather than generic emotion. A villain with given circumstances (royal blood, cursed status, specific loss, particular target) is much more interesting than a generic angry villain.
Take notes on given circumstances when preparing material. Don't try to keep it all in your head. Externalize the analysis so you can reference it during performance.
Curse Words and Insults With Specific Weight
A specific application of given circumstances: when a character delivers an insult or curse, the weight of that delivery depends on what the word means in the world of the story.
If a character says "tarnished" as a curse, that word carries the specific weight of whatever "tarnished" means in their world. Maybe it refers to a fall from grace, a contamination of bloodline, a loss of honor that the speaker genuinely views as the worst thing a person can be. Delivered with the awareness of that weight, "tarnished" lands as a real curse rather than a strange word choice.
Without the given circumstances of what the word means, the same line falls flat. You're saying a word that doesn't have specific weight to you, so it doesn't have specific weight to the audience either.
Build the meaning into your understanding. When you deliver insults, threats, declarations of love, or any emotionally loaded language, know specifically what those words mean in the world of the story. Let that meaning fuel the delivery.
Getting Started in Voice Acting: The Practical Workflow
For aspiring voice actors at the entry level, the practical questions are different from the artistic ones. What gear do I actually need? What software? Where do I start submitting? How do I build experience?
Here's the practical workflow that works for most beginners.
Microphone
A decent USB or XLR microphone in the entry-level price range can produce broadcast-quality audio with appropriate setup. Brands like Fifine offer affordable options that perform well above their price point. You don't need to spend thousands on gear to start.
Note the exact model of any microphone you buy. Not the brand alone. The specific model matters because microphones vary significantly within a brand's product line, and online reviews and tutorials are model-specific.
Audio Interface (For XLR Microphones)
If your microphone is XLR rather than USB, you need an audio interface to connect it to your computer. Options like the Focusrite Scarlett Solo are widely used in entry-level voice acting and produce excellent audio quality.
USB microphones connect directly to your computer without an interface, which simplifies setup at the cost of some flexibility for upgrading later.
Recording Software
The standard recommendation for entry-level voice acting is Audacity. It's free, open source, available for Mac and Windows, and has the largest community of tutorials and how-to videos available for any audio editing software. Whatever you need to learn how to do, someone has made an Audacity tutorial about it.
Don't agonize over software choice at the entry level. Audacity will serve you well for years before you potentially graduate to more advanced software like Reaper or Adobe Audition. Many working voice actors continue using Audacity throughout their careers.
Download it, install it, and watch a basic how-to video before your first recording session. The learning curve is gentle.
Recording Space
You'll want some kind of treated recording space. The DIY option that works for most beginners: a simple PVC frame draped with moving blankets, set up in a quiet room.
The build process:
PVC pipes assembled into a frame roughly 4x4x6 feet (or whatever fits your space)
Moving blankets draped over the frame to absorb sound reflections
Located in the quietest room you have access to
Microphone placed inside the frame at the right height for your mouth
This kind of setup costs a small fraction of what a professional booth would cost and produces audio quality that's competitive with much more expensive setups. The acoustic principle (soft surfaces absorbing reflections) doesn't require expensive materials to work.
Plan to build this kind of setup within your first couple of months of serious voice acting work. It's the difference between recordings that sound amateur and recordings that sound professional.
Casting Call Club for Practice
For getting started with auditions, Casting Call Club is the standard recommendation. It's a platform with thousands of voice acting roles, many of them unpaid or low-paid, where you can submit auditions and start building experience.
Don't focus on booking initially. Focus on submitting. The volume of submissions is what teaches you the audition workflow, builds your confidence, and exposes you to a wide range of material.
A reasonable early goal: submit 100 auditions in your first few months on the platform. Most won't book. That's fine. Each one is practice.
Use a Stage Name
For early work, consider using a stage name and a dedicated email address rather than your real identity.
The reason: your earliest recordings will be uneven. You'll experiment with techniques that don't quite land. You'll work on indie projects whose final quality you can't fully control. You'll be in early-career stages that you'll eventually outgrow.
A stage name lets you build experience freely without every rough early credit attached to your long-term professional identity. Once you're more established and confident in your work, you can transition to your real name (or keep the stage name if you've grown attached to it).
The dedicated email also keeps casting platform notifications separate from your personal inbox, which becomes important fast.
The Long Game
A final perspective for anyone starting out in voice acting: this is a long-term pursuit, not a quick win.
The voice actors who build sustainable careers are the ones who treat the early years as professional development rather than failed booking attempts. The work you do now (building gear, learning software, developing diction, applying acting frameworks like the color wheel, submitting hundreds of auditions) compounds over years into a career.
The hundredth audition is delivered by a different performer than the first. The work changes you. The accumulated craft, the developed diction, the emotional sophistication you build through deliberate practice, all of this becomes who you are as a voice actor.
Don't rush it. Don't compare your early work to others' established work. Don't quit because the early returns feel small.
Build the foundation. Trust the long game. Show up to every recording session, every audition, every coaching opportunity as a chance to develop. The career is the accumulation of all these moments, not any single breakthrough.
Putting It Together
For emotional depth:
Identify the dominant emotional color of any scene
Look for secondary colors that add complexity
Map specific colors to specific lines or moments
Use brief color cues during performance rather than lengthy analysis
Practice receiving directional notes from coaches without overthinking
For diction development:
Cover different consonant patterns with varied exercises
Slow down deliberately during recording
Move your mouth more physically than feels natural
Build the muscle memory of clarity over time
For scene analysis:
Identify given circumstances before performing
Take notes on the established facts of the scene
Build specific meaning into emotionally loaded language
Externalize your analysis rather than keeping it all in your head
For practical workflow:
Invest in entry-level gear that punches above its price point
Start submitting on Casting Call Club with a stage name
Aim for 100 submissions in your first months as a development goal
For long-term development:
Treat early years as professional development, not booking attempts
Trust that accumulated work compounds over years
Don't compare your starting point to others' established work
Show up consistently for the practice that builds the career
Voice acting rewards depth, precision, and patience. The performers who break through aren't the ones with the most natural talent. They're the ones who deliberately develop their emotional range, refine their diction, analyze their material thoroughly, and submit consistently over years.
Start where you are. Build the foundation. Apply the frameworks. Submit the work.
The career is built one audition at a time. Get to work.
Looking for more?